DECEMBER 2019 NEWSLETTER
Posted by Christer Backlund on
“A day late and a dollar short” seems to be my motto lately. Too much to do and not enough hours in a day. But, part of the reason this letter is later this month, was to avoid having this newsletter/blog get lost in the Black Friday/Cyber Monday crush in your inboxes. I decided to wait until today to send it out.
I hope y’all had a great Thanksgiving with your family and friends. We did and I ended up cooking 2 separate Thanksgiving dinners! Too many busy conflicting schedules for my whole family to get together in 1 place at the same time. Here comes the Christmas season with all it’s many delights. If you are stumped on gift giving ideas, we have plenty here at the Cottage for all types of creative people. Beautiful new fabrics, fun glow-in-the-dark Intergalactic, new patriotic fabrics, new flannels and some sweet girl prints. As well as an array of great notions and fun gifts, including new puzzles. We still have a good assortment of Christmas fabrics, but they are thinning out. Don’t miss out if you need some. Come on in if you’re in the area, we love to see y’all.
I know everybody’s “ToDo” lists are probably a mile long, I know mine is never ending. I would hate to waste your time coming to visit us and find we are closed. 😩 Please mark your calendars with our closed days in December. We will be closed an extra Saturday in the middle of the month so that we can attend our oldest daughter’s graduation and pinning ceremony. She has worked so very hard for this midlife career change and we can’t miss it. We are very proud of her and her accomplishments. She will be graduating with her BSN RN.
We want to wish everyone a safe and Happy Holiday season. We look forward to seeing y’all in the new year, this will be our 7th year here at Little Cottage Quilt Shop. Can you believe it’s been that long? We do appreciate all your patronage and love seeing what you are doing. We are looking forward to seeing many of you in 2020. Let’s see what it brings our way. Stay warm & cozy thru this season and share some kindness with others.
Creative Stitcher’s Club meeting Friday Dec. 13th Continuing work on the Cast-On stitch, plus additional stitches as time allows. Please bring your basic embroidery supplies and floss. (needles, scissors, needle threader, thimble, hoop, and if needed a desk type light and magnifying glasses.) ☺️
Remember, anything you purchase during the meeting that pertains to your project is 20% off, including books
Warriors Heart Quilt project
We have received many beautiful quilts from all over the country for this very worthy cause. If you are looking for a project with meaning, feel free to contribute to our Warriors Heart Quilt Project. (Please remember these quilts and pillowcases are for adults) We have kits available for your convenience at wholesale prices or you can use up your stash if you choose. If you need the instruction sheet, let me know and I will email you a copy. You can check out Warriors Heart on their website. www.WarriorsHeart.com
We are also a drop off point if you are participating in the Million Pillowcase Challenge.
Valuable Info
Merry Christmas. I would love to give a gift to each and every one of you, but that’s a bit difficult. So I am sharing this cute ornament pattern with you. I have a couple hanging in the shop and have been ask for the pattern several times. Here is my gift to you. It’s easy to make and fun to hang around the house for the holidays. It can also help use up your scraps! A big bonus! Enjoy and have fun this season ☺️ 🎄
Prairie Point Star Ornament

Materials required:
Sixteen 5” charm squares or scraps that size
5″X10″ scrap of cotton fabric or two 5″ squares (These will be completely covered so use whatever scraps you have.)
Polyester stuffing
3 ½” (or longer) doll needle
Strong thread. (ie: 12 or 30 wt quilting thread)
Satin cording or ribbon for the hanger
2 Buttons for the center (one for each side)
To make the inside of the ornament:
Fold the 5″X10″ scrap of fabric in half or if using 5″ squares, place one on top of the other.
Use a compass to draw a 4.5″ diameter circle.
If you don’t have a compass, you can use the lid of a yogurt container as a template.
Stitch completely around the circle following the pencil line. (A) Use pinking shears to trim the seam allowance. (B)
A)  B)
B)
Alternatively, the seam allowance can be trimmed to ¼” and notched as shown for ease if turning.

Pull the layers of the circle apart. Cut a small X in one side of the circle for turning it right side out.(C) Avoid cutting the X too close to the center as you will be sewing through the center point several times Turn the circle right sides out thru the X. Then mark the center point on both sides. (D)
- C)
 D)
D) 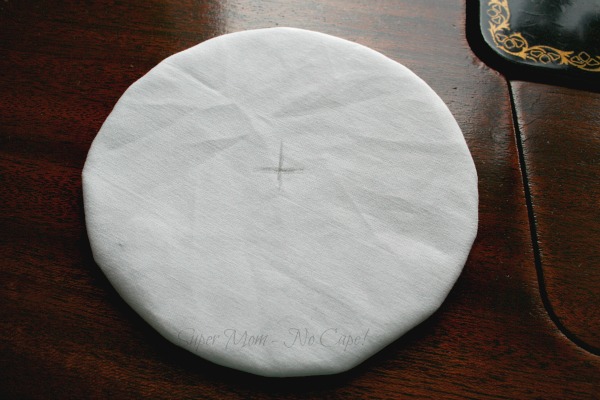
 D)
D) 
Stuff lightly thru the cut X.. You want it kind of flat-ish, a puffed circle, not a round ball. Whip stitch the X closed after stuffing. Set aside.
To make the prairie points:
Divide the charm pack or 5” scraps, into colorways. Chose a “charm” (5” square) a place it wrong side up on an ironing surface. Fold it in half diagonally forming a triangle and press. (1) Fold the triangle, corner to corner along the folded edge to form the Prairie Point (2) Repeat until you have 16 prairie points
1)  2)
2) 
To Assemble the ornament:
Thread the long doll needle with about 30”of thread and tie a strong knot. Insert the needle into the center mark on one side and draw through the make on the opposite side of the stuffed circle. (3) Place one corner of a prairie point on the needle coming thru the center mark and take a stitch. (4)
3) 4)
4) 
Fold the prairie point over the circle to the center mark on the opposite side of the circle. Run the needle thru the center mark again and thru the opposite corner of the first stitch. 
Continue this method to add prairie points around the circle.

If it becomes difficult to pull the needle thru all the layers of fabric, a pair of hemostats or needle nose pliers can help to pull the needle thru. It can get a little tricky to sew that last prairie point in place as it needs to be tucked under the first prairie point. 
Once all the prairie points are sewn in place, secure the thread with a knot but don’t cut the thread yet. Cut a 12” length of cording or ribbon to make the hanger. Sew the cording or ribbon in the center of each side of the circle. Sew a pretty button in the center, over the hanger attachment point. Secure with a strong knot and cut the thread
Hang and enjoy !